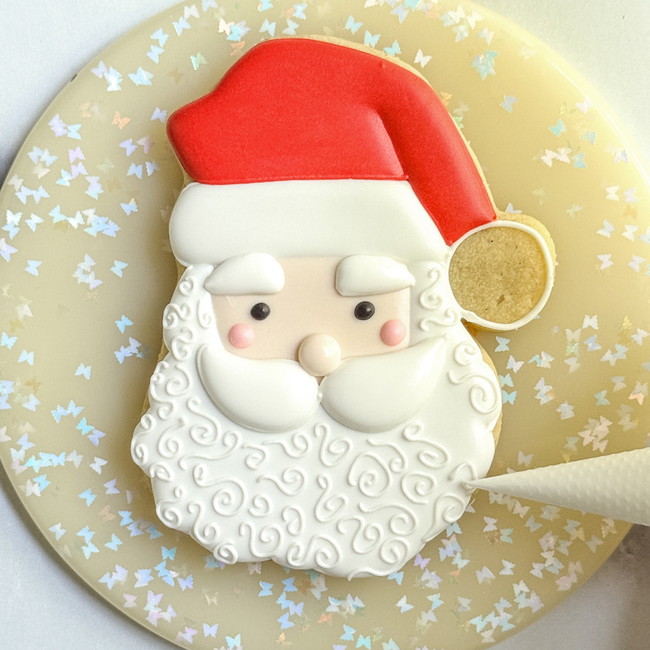
Santa Face Cookie Decorating Tutorial
Ho, ho, ho! Learn how to decorate a cookie to look like Jolly Saint Nick! Santa Claus is sure to be delighted to see these cookies alongside his milk on Christmas Eve.
- Print recipe
- Share on Twitter
- Share on Facebook
- Share on Pinterest

-
Santa Face Cookie Cutter
-
Royal Icing
-
4 tipless piping bags
-
Super Red Food Coloring
-
Bright White Food Coloring
-
Super Black Food Coloring
-
Bubblegum Pink Food Coloring
-
Scribe tool or toothpick
-
1
Bake and cool cookies full before decorating. Prepare the following:
Outline/Piping Consistency:
Ivory
White
Red
Black
Light PinkFlood Consistency:
Ivory
White
Red -
2
Using the white outline consistency icing, outline the following sections, as shown in the photos:
A. Santa’s hat pom-pom
B. Santa’s hat trim
C. Santa’s beard: For this section, I outlined in a continuous swirling motion, following the shape of the cookie. If you need a visual for how this type of outline is done, please reference the Santa Face cookie decorating video below. -
3
-
4
-
5
Using the ivory outline consistency icing, outline the section for Santa’s face, as shown in the photo.
-
6
Add a squiggle of white outline consistency icing in the section for Santa’s hat trim.
Let the icing dry for 1-2 minutes, then fill in with the white flood consistency icing.
Use your scribe tool or toothpick to smooth out the icing and pop any air bubbles. Allow this section to dry for 15-20 minutes before moving onto the next step.
Pro Tip: Adding a squiggle of outline consistency icing to small flooded sections of a cookie prevents “cratering,” which is when the flood icing collapses as it dries, leaving a divot in the flooded section. The squiggle of outline consistency icing helps to support your flood layer.
-
7
-
8
-
9
Fill in Santa’s beard with the white flood consistency icing.
Use your scribe tool or toothpick to smooth out the icing and pop any air bubbles. Allow this section to dry for 15-20 minutes before moving onto the next step.
Pro Tip: Allowing these sections time to dry in between steps is important to create definition in our design. Royal icing takes 12-24 hours to completely dry, but depending on the size of the section, the consistency of icing used, and level of humidity in the environment, it can take as little as 5-15 minutes for the icing to “crust over.” Once the icing gets to this step, we can pipe neighboring sections, while maintaining the definition we would like to achieve. Just be careful when handling cookies with crusted over icing as the icing can easily crack when handled. I like to decorate and dry my cookies on a baking pan, so I’m not having to transfer them to different surfaces. It’s a good practice to set a table fan in front of drying cookies—this speeds the drying process. You can also use a dehydrator on its lowest setting for 10-15 minutes to speed up drying.
-
10
-
11
Using the ivory flood consistency icing, fill in the section for Santa’s face.
Use your scribe tool or toothpick to smooth out the icing and pop any air bubbles. -
12
-
13
Outline the section for Santa’s hat with the red outline consistency icing.
-
14
Fill in this section with the red flood consistency icing.
Pro Tip: Pay special attention to the crease, where his hat folds over! We want to maintain the outline, so be aware that this can be tricky to pipe around. I like to avoid piping right up to this line, and instead, go close to the line and drag the flood with my scribe tool, so that is barely touches, but doesn’t go over the line. This maintains that nice definition where Santa’s hat folds over.
-
15
-
16
Pipe Santa’s mustache with the white outline consistency icing.
Fill in these sections with the outline consistency icing to give them a nice puffy look.
Outline icing consistency is thicker, but because this is a smaller section, it should settle easily with some manipulation from your scribe tool.
Allow this section to dry for 10-15 minutes before moving onto the next step. -
17
-
18
-
19
-
20
Pipe a small dot for Santa’s nose with the ivory outline consistency icing. Be sure to lift your piping bag straight off of the cookie so that the icing falls into a nice dot shape. Use your scribe tool or toothpick to smooth out the icing and to gently move it around to the desired shape.
-
21
Using the white outline consistency icing, outline Santa’s eyebrows. Give the outline a minute to dry, and then fill in with the white outline consistency icing. Settle the icing with your scribe tool or toothpick. Be sure to pop any air bubbles, and you can use your scribe tool or toothpick to gently move the icing into your desired shape.
-
22
-
23
Pipe two small dots on Santa’s cheeks using the pink outline consistency icing.
-
24
Use the black outline consistency icing to pipe two small dots for Santa’s eyes.
-
25
-
26
Pipe small swirls all over Santa’s beard with the white outline consistency icing. This gives the beard a fun, whimsical texture.
-
27
Finish your Santa Face cookie by filling in the pom-pom on his hat with white outline consistency icing. Settle the icing with your scribe tool or toothpick. Be sure to pop any air bubbles to ensure the icing dries nicely.
-
28
Recipe Video
Enjoy!
Cookie decorated by Laura Luk of Butterfly Bakes


